Deviled eggs for Easter? Why, yes please!

easter-bunny-meme-eggs

I love deviled eggs, and there’s nothing more perfect for Easter.  They’re light but filling, and taste soooo good.

Here’s a classic recipe for deviled eggs.  Personally, I like using spicy brown mustard and regular mayo over the light type.  But that’s just me.  I think they taste better that way.  You can substitute these things if you like a richer taste or prefer your eggs a bit spicier.

Easy Classic Deviled Eggs

This recipe is based on the classic formulation for deviled eggs. Just a nice, quick recipe that is easy to make and tastes great.

This recipe is not spicy at all and as such is a good choice for family get-togethers where there are children and you’re catering to a wide variety of tastes.

 The filling of this recipe is on the firm side. Add a tad more mayo if you would like it a bit softer.

Ingredients:

6 hard-cooked eggs, peeled and cut lengthwise:

To boil eggs (I always have to look this up):  Cover 6 eggs in a saucepan and bring water to a full boil.   Turn off heat.  Cover pan; let eggs sit for about 12 minutes — they will continue to cook in the hot water.   Drain off the water then rinse with cold water (this makes the eggs easier to peel).   Slice eggs length-wise.

¼ cup Light Mayonnaise or Salad Dressing (I use regular mayo)
½ teaspoon dry ground mustard  (I use the spicy brown jarred type or even a little stone ground!)
½ teaspoon white vinegar
1/8 teaspoon salt
¼ teaspoon ground black pepper
Paprika for garnish

How to Prepare:

Pop out (remove) the egg yolks to a small bowl and mash with a fork. Add mayonnaise, mustard powder, vinegar, salt and pepper and mix thoroughly. Fill the empty egg white shells with the mixture and sprinkle lightly with paprika.

Cover lightly with plastic wrap and refrigerate for up to one day before serving.  (I never wait that long — I let them chill a little in the fridge, and then eat!)

I’m stuffed, grateful and relieved it’s over.

We had a really nice day. The temperatures were in the 70s today and there was on and off rain all day. I felt more like I should be saying “Happy Easter” than “Merry Christmas.” We had dinner at my daughter and husband-to-be’s house. Although I’m not Italian, for the past 6 years or so I’ve been making meat and spinach lasagna for Christmas dinner. It’s a wintery dish, and is red and green and everyone seems to like it. I assembled it at my place, then brought it over to bake in their oven.

I brought the gifts over and watched as everyone opened theirs. My daughter got me a new phone! The one I had was starting to act weird and has never gotten a good signal. I think she was just sick of hearing me complain about my crappy phone so she got me a better one. 🙂

Seriously though, it was a thoughful gift. I did find out some *slightly* disturbing news though: although the doctors are quite sure my daughter’s stomach problems are due to Crohn’s disease, they want to rule out anything more serious, so she has to go have both a colonoscopy and endoscopy this week. Yikes. I don’t envy her a bit, but it will be good to know with 100% certainly that it’s “just” Crohn’s disease.

The ex (her dad) stayed out of the way in the kitchen or out on the sun porch playing with the dog. No family drama this year at all!

All in all, it was a good day. I always dread Christmas but almost always wind up having a good time. That doesn’t keep me from being relieved when it’s over.

Here is the lasagna recipe. If you try this let me know how it turns out for you.

“Healthy” lasagna.

lasagna

Ingredients
1 lb. ground beef, drained.
1 32 oz. jar or can of tomato sauce
1 large can of tomato paste
1 box pot-ready lasagna (you can use the kind you have to boil too, but it’s more work and always falls apart for me)
green onions
16 oz. shredded mozzarella cheese
Parmesan or Romano cheese
1 container Ricotta cheese.
chopped frozen spinach (1 small box or 1/2 16 oz. bag)
Olive oil
Italian seasoning
garlic (optional–I can’t eat it)

Mix the sauce, tomato paste, a little olive oil and Italian seasoning in saucepan. In another pan, cook the ground beef until done. In another pan, steam the spinach and drain. In a separate bowl, mix the ricotta cheese in with the steamed spinach (wait until spinach cools some before doing this).

How to assemble.
Get the pan ready (use a lasagna-sized foil or glass pan) by pouring a little olive oil on the bottom and then a layer of sauce.
On top of that lay the lasagna sheets (if pot ready there is no need to boil them first), then spread half the ricotta-spinach mixture.
Sprinkle about a third of the shredded mozzarella on top of that.
Put half of the ground beef on top of that and spread out.
Pour another layer of sauce on top of that.
Put another layer of lasagna sheets on top.
Spread the other half of the ricotta-spinach mixture.
Put another third of the mozzarella cheese on top.
Sprinkle the other half of the ground beef.
Spread another layer of sauce.
Put another layer of lasagna sheets.
Pour the rest of the sauce on top.
Sprinkle the last third of the mozzarella cheese.
Put a layer of parmesan or romano cheese on top (this browns nicely).
Green onions (chopped) to garnish.

Bake at about 300 ° for about an hour. Serves about 10.

Crock Pot® chili!

chile1

This is a very good chili recipe and so easy to make if you’re the proud owner of a Crock Pot® (I have no idea what I’d do without mine during the colder months). I made this today and it’s even better the second day–I can’t wait for tomorrow!

Ingredients:
1 lb. chopped hamburger meat
2 16 oz. cans or 1 32 oz. box of spaghetti sauce (I like Hunt’s)
2 16 oz. cans of chili or pinto beans
1 6 oz. can tomato paste
1 16 oz can diced skinned tomatoes
1/2 package of Sun-dried tomatoes–julienne cut (You can find these in the produce department)
1 large onion.
a few tablespoons olive oil.
2 cups water
1 package of Chili mix seasoning
Chili powder (optional)
Diced green onions (optional)
Red pepper

chile2

Instructions:
In a large frying pan, cook the chopped meat until completely done. Drain the oil from the meat and place inside the Crock Pot® (or other slow cooker). Drain the beans and add to the meat, then stir. Dice the large onion into small pieces and add to the meat and bean mixture. Add in the spaghetti sauce, tomato paste, diced tomatoes, Sun-dried tomatoes, olive oil, red pepper (I use about 2 tablespoons), chili seasoning, and chili powder (optional–recommended if you like your chili extra hot), then add the water and stir until mixed thoroughly. Cover the Crock Pot® and set on High. Chili will be ready to eat as soon as all the water is absorbed (about an hour) but I like to wait at least 2-3 hours before eating because the longer it cooks, the more flavorful it gets.

If you like, top the chili with grated sharp Cheddar or Mexican cheese, and garnish with the diced green onions.

After several hours of cooking, set the Crock Pot® on Low and leave the chili in the pot until the next day (if it lasts that long).

Krispy Kreme bread pudding.

Sometimes creative ideas come out of the prospect of having to throw something away.

I was given a box of a dozen stale Krispy Kreme (plain glazed) donuts and they sat in my refrigerator for a week. When I tried to bite into one yesterday, it was hard as a rock. I was going to toss them in the trash, but suddenly I had a better idea.

I thought of the bread pudding I used to make using stale old (non-moldy) bread. I decided why not make a bread pudding out of the Krispy Kreme donuts? Everything would be the same, except obviously since the donuts are already sweet, not as much sugar would be needed.

So I got to work. Here is the result, and it tastes as good as it looks!

krispy_kreme_pudding2 Krispy_Kreme_pudding

Here is my recipe (I made this one up as I went along but I think it’s very similar to standard bread pudding recipes):

Ingredients:
1/2 cup brown sugar; 1/2 cup granulated sugar
2 tablespoons course grained turbinado sugar (optional)
2 tablespoons of powdered cinnamon
2 large eggs
2 cups milk
12 stale Krispy Kreme donuts
1 1/2 stick butter
1/2 teaspoon vanilla extract

Directions:
1. Grease 9 x 13 baking pan with butter or margarine. (I prefer glass)
2. Cut or break donuts into small pieces and put in large mixing bowl.
3. Mix milk, eggs, cinnamon and vanilla together in another bowl
4. Melt 1 stick of the butter in the microwave until soft, add to the donut pieces and mix until moistened
5. Mix in the milk, vanilla, cinnamon and egg mixture
6. Stir in large bowl until ingredients are well mixed.
7. Spoon mixture into baking pan; flatten on top with spatula.
8. Sprinkle the turbinado sugar on top (this gives it a nice crunchy texture)
9. Cut 1/2 stick butter into small pieces and spread pieces on top.
10. Bake at 300% until butter is completely melted and the pudding turns bubbly and golden brown on top (about 20 minutes)
11. Set aside and allow to cool
12. Serve and enjoy!

Lucky Otter’s flourless mac ‘n’ cheese

mac_and_cheese
Tonight’s dinner.

I’ve been making this for years. My kids adored it when they were young and still do. It’s a very simple recipe and tastes great! And unlike other macaroni and cheese recipes, it uses no flour.

I decided to make it tonight because I wanted some “comfort food” but didn’t want to spend a lot of time in a hot kitchen!

Ingredients:

2 large eggs
1 stick of butter (you can substitute margarine but I prefer butter), softened
16 oz. shredded sharp cheddar cheese
8 oz. container of whole milk (4% milkfat) cottage cheese (you can use lowfat too)
1 16 oz box of elbow macaroni, penne, farfalle (bow ties) or other small pasta of your choice (I like DaVinci Twists best for this recipe)
Italian seasoned bread crumbs
1 tablespoon Parmesan cheese
Green onions chopped into small pieces (optional)
Sea salt (any salt will do, really)

Directions

1. In a large pot, boil water with about a half teaspoon of salt added.
2. When water boils, add pasta of your choice
3. In a large mixing bowl, mix 3/4 of the shredded cheese, cottage cheese, butter, eggs and parmesan cheese into a paste; set aside.
4. When pasta is cooked, drain and run cold water over it to rinse off the starch
5. Add the pasta to the cheese mixture, and mix thoroughly
6. If you wish, add the green onions.
7. Spoon the mixture into a lasagna-sized glass or foil baking pan
8. Add the remaining 1/4 of shredded cheddar cheese to the top and add a few more green onion slices if you wish
9. Sprinkle the bread crumbs and a little more parmesan cheese on top.
10. Bake at 300 degrees for about 20-25 minutes until bread crumbs are golden brown and cheese is melted.
11. Serve and enjoy!

The best cake I ever ate.

princess_cake

When I was about 14, my mother and I spent a weekend in Connecticut with some Swedish friends of hers. I never forgot the cake they served. I think it was probably the best cake I ever had. I couldn’t get enough of it. I was told it was called a Princess cake and is a traditional dessert in Sweden.

Wikipedia has a good article about this delectable cake. It has an interesting history too.

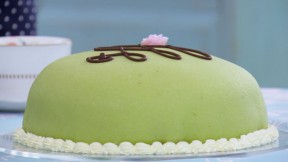
A princess cake (prinsesstårta in Swedish) is a traditional Swedish layer cake consisting of alternating layers of airy sponge cake, pastry cream, and a thick-domed layer of whipped cream. This is topped by marzipan, giving the cake a smooth rounded top. The marzipan overlay is usually green, sprinkled with powdered sugar, and often decorated with a pink marzipan rose.

The original recipe first appeared in the 1930s Prinsessornas Kokbok cookbook, which was published by Jenny Åkerström, a teacher of the three daughters of H.R.H. Prince Carl, Duke of Västergötland. The cake was originally called grön tårta (green cake), but was given the name prinsesstårta or “princess cake” because the princesses were said to have been especially fond of the cake. The princesses were H.R.H. Princess Margaretha (1899–1977; later Princess of Denmark), H.R.H. Princess Märtha (1901–1954; later Crown Princess of Norway), and H.R.H. Princess Astrid (1905–1935; later Queen of the Belgians).[3] The cake is widely featured in Tom McNeal’s book Far Far Away.

princess_cake2

I attempted to make a Princess cake once, but didn’t have much luck with the whipped cream, which turned to a gooey liquid and created a mess of the beautiful smooth marzipan coating. It’s not an easy recipe, but if you want to try making one yourself, here is a recipe that looks good: http://www.pbs.org/food/recipes/prinsesstarta-princess-cake/

For the marzipan, some grocery stores sell it in ready made tubes in the baking section, which could save you time instead of having to crush the almonds yourself. You can also use a good storebought jam instead of making your own, which may simplify things. The chocolate piping in this recipe is optional. I don’t think it’s necessary. The fondant rose is a nice touch, but also is optional. A dusting of powdered sugar on top of the marzipan with no further embellishments still looks great.

Ingredients

For the vanilla custard:
600ml (20 fl oz) milk
1 vanilla pod, split in half lengthways and seeded scraped out
6 free-range egg yolks
100g (3½ oz) caster sugar
50g (1¾ oz) cornflour
50g (1¾ oz) unsalted butter

For the jam:
200g (7 oz) raspberries
175g (6 oz) jam sugar

For the sponge:
4 large free-range eggs
150g (5½ oz) caster sugar
75g (2½ oz) cornflour
75g (2½ oz) plain flour
1 tsp baking powder
50g (1¾ oz) butter, melted

For the fondant rose:
25g (1oz) pink ready-to-roll icing
icing sugar, for dusting
To decorate:
750ml (1⅓ pints) double cream
50g (1¾ oz) dark chocolate (36% cocoa solids), melted

For the marzipan:
400g (14 oz) ground almonds
150g (5½ oz) caster sugar
250g (9 oz) icing sugar, plus extra for dusting
2 medium free-range eggs, beaten
1 tsp almond extract
green food coloring paste (do not use liquid food coloring)

princess-cake640x360-288x162
The finished result of this recipe.

Directions
For the vanilla custard, pour the milk into a pan with the vanilla seeds and vanilla pod and place over a low heat until just simmering. Remove from the heat.

In a large bowl, whisk the egg yolks, sugar and cornflour together until pale and creamy.
Remove the vanilla pod from the warm milk. (You can rinse this off to use in making vanilla sugar.)

Stir the warm milk slowly into the egg mixture. Pour the mixture back into the pan and cook over a low heat for 4-5 minutes, whisking, until the mixture thickens. (It should be very thick.)
Remove from the heat and beat in the butter until melted and incorporated. Transfer to a bowl, cover the surface with clingfilm to prevent a skin forming and leave to cool. Set aside to chill in the fridge.

For the jam, tip the raspberries into a deep saucepan with the sugar and two tablespoons of water. Cook gently over a low heat, stirring occasionally, until the sugar is dissolved. Bring the mixture to the boil and boil vigorously for about four minutes, or until the temperature reaches 104C/219F on a sugar thermometer. Transfer to a heatproof bowl and leave to cool completely.

For the sponge, preheat the oven to 180C/160C(fan)/Gas 4. Grease and line the base of a 23cm (9 in) springform tin with baking parchment.

Put the eggs and sugar into a large bowl and using an electric mixer, whisk together until the mixture is very pale and thick and the whisk leaves a trail on the surface when lifted. This will take about five minutes.

Sift the cornflour, flour and baking powder over the egg mixture and carefully fold in using a large metal spoon. Fold in the melted butter, taking care not to over mix.

Pour the mixture into the lined tin and bake for 25-30 minutes until the sponge is golden-brown and has just started to shrink away from the sides of the tin. Remove from the oven and set aside to cool. When cool enough to handle, turn out on to a wire rack to cool completely.

For the fondant rose, roll 10 little pieces of fondant into small balls about the size of a cherry stone.

Dust two small pieces of greaseproof paper with icing sugar and one by one, place the balls of fondant between the sheets of greaseproof and flatten each ball out with your fingers, to a thin circle, approximately 2cm/1in in diameter. These form the petals. Roll the first petal up like a sausage to form a bud and wrap the remaining petals around the bud to make a rose. Bend and curl the edges of the petals, to make them look more realistic. Leave to dry for at least an hour.

To assemble the cake, using a serrated knife, cut the cake horizontally into three even layers. Place one of the sponges onto a serving plate. Spread a very thin layer of custard over the base of the first sponge.

Spoon a quarter of the custard into a piping bag fitted with a small plain nozzle and pipe a border around the edge of the sponge – this is to contain the jam.

Spoon the jam over the sponge, and spread evenly within the border.

In a bowl, whip 600ml/20fl oz of the double cream to firm peaks. Fold half of the whipped cream into the remaining custard.

Spread one-third of the custard cream over the jam.

Place the second sponge on top and spread over the remaining custard cream.

Place the third sponge on top. Spoon over the remaining whipped cream covering the sides and smoothing into a small dome shape on the top. Set aside in the fridge for an hour.

For the marzipan, mix the ground almonds and sugars in a mixer fitted with a dough hook, before adding the eggs and almond extract.

Knead in the bowl until it forms a stiff dough. Turn out onto a surface dusted with icing sugar. Using a cocktail stick add a tiny amount of green food coloring and knead to an even pastel green color.

Roll out the marzipan on a surface lightly dusted with icing sugar, to a 40cm/16in diameter circle, large enough to cover the cake. Lift the marzipan up over the cake and using your hands, shape the marzipan around the sides of the cake to get a smooth finish. Trim any excess.

Whip the remaining 150ml/5½fl oz of cream to medium peaks and spoon into a piping bag fitted with a small star nozzle. Pipe around the base of the cake.

Spoon the melted chocolate into a small paper piping bag. Snip off the end and pipe a swirl over the top of the cake. Top with the fondant rose.

pink_princess_cake
A pink princess cake.

You can also order a Princess cake from several online sources. They aren’t cheap, but the expense may be worth it if you’re not a pretty advanced baker. I couldn’t find any simple recipes for this cake.

Here are a few online outlets where you may order one.

Copenhagen Bakery and Cafe: http://www.copenhagenbakery.com/product/Princess-Cake/
Schubert’s Bakery: https://www.schuberts-bakery.com/whipped-creme-cakes/swedish-princess-cake.html
IKEA used to sell these cakes too, but all I could find on their site was a miniature version that looked like a cupcake. Here it is, if you’re interested: http://www.ikea.com/us/en/catalog/products/30206306/

I would buy an entire case of these.

fiberone_lemonbar

My foodie readers should be happy. 🙂

I simply cannot get enough of these. I usually am not a big fan of “health” bars, but these are fantastic! They are chewy and lemony (natural, not artificial lemon flavor), with an irresistable slightly crunchy drizzle of lemon glaze on the surface. They don’t taste like something healthy but they actually are pretty good for you and loaded with fiber and Vitamin C.

The only problem I have with them is that I can’t stop at just one. If I have a box (which contain 6 bars) I wind up eating the entire box!

The other problem is that, like all nutrition/health snacks, they aren’t cheap.

So I’m going to tell you how you can make your own. Homemade ones are just as good as Fiber One’s (though maybe a little less healthy). Some commercial mixes result in a more custardy, eggy (and less chewy) lemon bar. That’s okay if you don’t mind a more custardy texture. They’re quite good, and the hardened lemon glaze gives them an interesting juxtaposition of textures.

You can make lemon bars from scratch too, of course. I know there are lots of recipes if you do a Google search, though I never have.

Lucky Otter’s Lemon Bars

Use a commercial lemon bar mix, like Betty Crocker or Duncan Hines. Follow the instructions on the box.
I always use real butter in place of margarine. I just think it tastes a lot better. To prevent burning, you can smear the pan with margarine or cooking oil.

Make a lemon glaze from scratch. Here’s how I do it:

Mix about a half cup of confectioner’s sugar with the juice from a few lemons. Mix until you get a thin consistency (but not so thin it’s watery) and then drizzle the glaze over the cooled lemon bars. It will harden and give the bars an enticing crunch.
If you like your glaze a little less intense, you can replace a little water (not milk!) for some of the lemon juice.

Move over, Hershey’s. I’m a chocolate snob.

chocolate

I admit it. I’m a chocolate snob.  Although I can barely afford it, you’ll always find me in the “gourmet chocolate” section of the candy department at the grocery store, drooling over (and sometimes buying) big dark chocolate bars studded with sea salt, bits of almonds, filled with raspberry fondant, or just plain naked chocolate.   It’s always dark–and the label usually reads Lindt, Ghirardelli (their huge 60% dark chocolate chips are to die for) or Green and Black’s.   Whatever is available at my local Food Lion, since I lack the funds to visit The Chocolate Fetish downtown, which makes handmade chocolates right on their premises.  I won’t even go near that store–because I would lose my mind if set loose in there.

ghirardelli

Around the year 2005, Target noticed its female customers were very different than Wal-Mart’s–thin, professional looking women who were attracted to their boldly colorful, minimalist, and trendy home furnishings and decor–the sort of women who would give side-eye to sentimental picture frames featuring an insert for each of baby’s first twelve years, “Footprints” plaques framed in gold-tinged plastic frames,  and particleboard/wood veneer furnishings of the type Wal-Mart offers.    

walmarttarget

Target realized that the commercial boxed chocolates Wal-Mart offers–with Hersheys Pot of Gold,  Russell Stover, and Whitmans Samplers being pretty much its highest-end offerings (all too sweet, too bland, and too focused on the milk chocolate)–would not do for these thin upper middle class women who parked their soccer mom SUVs at the Target up the street and wouldn’t be caught dead at Wal-Mart.   So Target came out with their own brand: Choxie.  

choxie choxie1 choxie3 choxie2 choxie4 choxie5
Yes, those really are all edible.

Choxie was packaged in interesting containers and featured “artisan” chocolates that contained things like infusions of green tea, chili powder, espresso, deep red raspberry puree with no added sugar, sea salt, and other unique ingredients and flavors intended to enhance or provide counterpoint to the taste of the chocolate. Some looked like little packages and just like real presents, they always contained a gustatory surprise. Choxie chocolates were also aesthetically pleasing–little works of art featuring colored candy squiggles worthy of Jackson Pollack, inserts of white or mocha or green mint chocolate, or different colored chocolates all swirled together in a way reminiscent of one of those “spin art” cards we old folks used to make at the fair as kids.    Their unbelievably delicious raspberry bombs were dusted in a sour raspberry powder to give them bite.   I loved the way my fingers turned red after eating a few.   All these candies were way too pretty to be eaten, but I ate them anyway, and they tasted as good as they looked.

About a month ago I went back to Target to find them.   But no one there even knew what Choxie was anymore, so apparently it’s no longer made and hasn’t been in some time.  Tears! I miss those tiny edible masterpieces, but I’ve found something almost as great:  if you’ve never tried Trader Joe’s Dark Chocolate Turbinado Sea Salt Almonds,  you have not lived.   As you can see from the photo,  they look like little rat turds, but ohhhh, baby, their sorry appearance is misleading! The experience of eating one is better than sex–and you will NOT be able to stop at just one.  They should probably be illegal. I even learned how to make them myself, and they are almost as good as Trader Joe’s.

traderjoes

Recipe: Lucky Otter’s Dark Chocolate Almonds Encrusted with Sea Salt and Turbinado Sugar

Two bars of plain dark gourmet chocolate–I like Ghirardelli’s.
Melt these over low heat until soft–do not allow chocolate to boil.
Set aside about 30-35 almonds, also a dish spread with sea salt, and another dish spread with about 2 tablespoons turbinado sugar.
Take the melted chocolate off the stove, and with a teaspoon, dip and swirl each almond in the chocolate, and then set each on a cookie sheet. Don’t worry if the chocolate makes a little pool around the almonds.
Allow the chocolate to harden but don’t let it harden completely. It should still be soft and malleable. With a teaspoon, coat each almond in the turbinado sugar, and then sprinkle a little sea salt on each. Be careful you don’t overdo it with the salt–there should be more sugar than salt on each almond. You can test a few to see what proportion tastes best, but they won’t taste good if you use too much salt–they should just have a hint of a salty taste.
Place the covered almonds on a dish and refrigerate for about an hour.
Enjoy.